Category Archives: Development

Folding code in Xcode

A colleague of mine has the practice of collapsing all the methods in an Objective C file when he loads it to simplify finding the right method to view. When I asked him how he did it, he couldn’t remember since it was an automatic action. I finally got around to figuring out how to do it.

The feature is called Code Folding and can be done using the pointer, the menu bar, and the keyboard.

Code Folding using the Pointer

You may have noticed the different colored gray bars on the left of your code in Xcode and may have even accidentally hovered over one of them and been treated to a drastic change in the UI. Those gray bars allow you to fold – or collapse – your code. Using those bars, you can fold any size block, such as an if block, a for block, an @synchronized block, or even a whole method block.

Hovering over the gray bar shows you the block that will be folded. Clicking on the gray bar folds the block and shows a yellow ellipsis between the curly braces where the block used to be. It also changes the gray bar to an arrow. Clicking the arrow or double-clicking the ellipsis will unfold – or expand – the folded block.

Code Folding using the Menu Bar

The code folding functionality is exposed in the menus accessible from the menu bar as well.  In Xcode 4, check out Editor -> Code Folding.

Code Folding using the Keyboard

Apple has defined default keystrokes for code folding, but I found that some of them conflicted with keystrokes defined for other functions. In most cases the conflicts were caused by changes I had made – either in Xcode or in Mac OS X Lion – to accommodate writing code.

The following code folding functionality can be controlled using the keyboard:

  1. Fold all methods and functions – Option + Cmd + Shift + Left Arrow
  2. Unfold all methods and functions – Option + Cmd + Shift + Right Arrow
  3. Fold the current block – Option + Cmd + Left Arrow
  4. Unfold the current block – Option + Cmd + Right Arrow

I had to change the fold/unfold block key bindings because they conflicted with the key bindings I had selected for switching between Spaces in Lion. I changed them to Ctrl + Cmd + Shift + Left Arrow/Right Arrow respectively. This, of course, required that I change another key binding in Xcode – the key bindings for fold/unfold comment blocks.

Comment blocks are blocks of comments using /* and */ as delimiters. Since I almost never use this style of commenting, removing the key binding for folding/unfolding comment blocks in favor of code folding/unfolding was a good trade-off for me.

Git and git-flow command line completion

I switch between the command line and a GUI tool called SourceTree to manage my Git repositories.  When I first installed git-flow, I noticed that the readme talked about command line completion.  It took me a while to get around to installing it, but I have to say that it is really impressive.

Git and git-flow command line completion works like the rest of bash against the file system.  It reminds me a little of PowerShell on Windows (that should tell you how much I know about bash).

To install command line completion on a Mac, you need to find a copy of the git-completion.bash script.  Some of the posts I read on the net seem to indicate that it should be installed with Git in a contrib folder, but I couldn’t find it (showing how new I am on a Mac), so I decided to just clone Git from Git-Hub. Once I had that, I created a link to the script in my ~/bin directory:

cd ~/src/external
git clone https://github.com/git/git.git git
cd ~
mkdir bin
ln -s ~/src/external/git/contrib/completion/git-completion.bash ./git-completion.sh

I did a similar thing for git-flow-completion:

cd ~/src/external
git clone https://github.com/bobthecow/git-flow-completion.git git-flow-completion
cd ~/bin
ln -s ~/src/external/git-flow-completion/git-flow-completion.bash ./git-flow-completion.sh

The next thing to do is to modify your .bash_profile to call those scripts.

source ~/bin/git-completion.sh
source ~/bin/git-flow-completion.sh

Now when you execute git commands from the command line, you can use tab to complete commands, branches, remotes, and features. On top of that, it works for both local and remote elements. Very cool!

Resources

Defensive Programming in Cocoa (from VTM_iPhone)

I’ve been attending the iPhone Developers Conference in Seattle hosted by Voices That Matter (check out VTM_iPhone for the Twitter stream), which has been really informative.  Easily the most informative session at the iPhone Developers Conference for me was Defensive Programming in Cocoa by Mike Ash.  On Mike’s blog he has a series called Friday Q&A and it appears that most of the material for his talk was taken from an article he posted in December with the same name.  Two sections really stand out for me.

Memory Management – Put all your memory management for member variables in the setter for that member variable rather than scattering it around the code.  So instead of doing this:

[_myMemberVar release];

do this:

self.myMemberVar = nil;

after implementing this:

@property (retain) MyClass * myMemberVar;
@synthesize myMemberVar = _myMemberVar;

or this:

- (void) setMyMemberVar: (MyClass *) myMemberVar
{
    if (_myMemberVar != myMemberVar)
    {
        [_myMemberVar release];
        _myMemberVar = [myMemberVar retain];
    }
}

Categories – Since someone could override a method in your category with their own method making your method impossible to call, name your methods in a way to reduce that possibility.  The converse is also true.  For example, if you define a method in a category for an Apple-provided class, Apple could later come along and define that method in a class category and then all their calls will go to your method instead of theirs.

Key-Value Observers – The only thing not covered in that article that he covered in his talk was something that I started applying immediately:  When implementing key-value observers, make sure your observer only handles the notification if it knows that it is for your class.  This is a problem because your observer could be overriding the superclass’s observer and your observer must call the superclass’s observer if the notification isn’t for you.

To solve this, always pass specific to your class as the context parameter to the addObserver: method.

static void * s_kClassContext = &s_kClassContext;
...
[obj addObserver: self
      forKeyPath: "foo"
         options: NSKeyValueObservingOptionNew
         context: s_kClassContext];
...
- (void) observeValueForKeyPath: (NSString *) keyPath
                       ofObject: (id) object
                         change: (NSDictionary *) change
                        context: (void *) context
{
    if (context == s_kClassContext)
    {
        if ([keyPath isEqual: @"location"])
        {
            ...
        }
    }
    else
    {
        // Notification is not for us.
        [super observeValueForKeyPath: keyPath
                             ofObject: object
                               change: change
                              context: context];
    }
}

Collapsing commits in Git

There are times with any source control system that changes are committed after which you realize that you made a mistake and need to make a quick change.  In those cases, it seems pretty silly to keep the history for both those commits.

Git supports collapsing commits natively with the git rebase command.  This command provides more than simply collapse functionality, and the collapse functionality appears to be provided only in an interactive mode.  Paralyzed Egg has a good article on how to do this, but there was one pitfall I fell into that wasn’t described there so I’ll provide the detailed instructions here.

The first step is to look at the log to determine which commits you want to collapse:

$ git log -3
commit d43ace68df8a298d205fb422b3261d69bc5d19e4
Author: David Potter <davidp@example.com>
Date:   Sat Mar 26 15:21:29 2011 -0700

    Move README back to the root.

commit 553561e3330ea60db8a3f7baadd08ef116d22129
Author: David Potter <davidp@example.com>
Date:   Sat Mar 26 15:20:46 2011 -0700

    Move project files to the src directory.

commit 41a6af9de1f0e3fb84ae46c301a0252d0f861f02
Author: David Potter <davidp@example.com>
Date:   Tue Mar 22 11:35:14 2011 -0700

    Updated API layer

In this case I had moved one too many files into the src directory and needed to move it back. I wanted to collapse the last two commits into a single commit. To do this, I executed the following command:

$ git rebase -i HEAD~2

This will bring up your editor.

Note that git expects the editor to return when it is done. I had my EDITOR environment variable defined to launch TextMate which returns immediately, which prevents this feature from working.

The contents of the editor will look something like this:

pick 553561e Move project files to the src directory.
pick d43ace6 Move README back to the root.

# Rebase 41a6af9..d43ace6 onto 41a6af9
#
# Commands:
#  p, pick = use commit
#  r, reword = use commit, but edit the commit message
#  e, edit = use commit, but stop for amending
#  s, squash = use commit, but meld into previous commit
#  f, fixup = like "squash", but discard this commit's log message
#  x <cmd>, exec <cmd> = Run a shell command <cmd>, and stop if it fails
#
# If you remove a line here THAT COMMIT WILL BE LOST.
# However, if you remove everything, the rebase will be aborted.
#

To merge those two into a single commit, change the second pick command to squash. Here is the result of that edit:

pick 553561e Move project files to the src directory.
squash d43ace6 Move README back to the root.

# Rebase 41a6af9..d43ace6 onto 41a6af9
#
# Commands:
#  p, pick = use commit
#  r, reword = use commit, but edit the commit message
#  e, edit = use commit, but stop for amending
#  s, squash = use commit, but meld into previous commit
#  f, fixup = like "squash", but discard this commit's log message
#  x <cmd>, exec <cmd> = Run a shell command <cmd>, and stop if it fails
#
# If you remove a line here THAT COMMIT WILL BE LOST.
# However, if you remove everything, the rebase will be aborted.
#

Save the file and exit. Git will bring up the editor with content that looks like this:

# This is a combination of 2 commits.
# The first commit's message is:

Move project files to the src directory.

# This is the 2nd commit message:

Move README back to the root.

# Please enter the commit message for your changes. Lines starting
# with '#' will be ignored, and an empty message aborts the commit.
# Not currently on any branch.
# Changes to be committed:
#   (use "git reset HEAD <file>..." to unstage)
#
#       renamed:    74-location.png -> src/74-location.png
#       renamed:    ACS-Info.plist -> src/ACS-Info.plist
#       renamed:    ACS.xcodeproj/project.pbxproj -> src/ACS.xcodeproj/project.pbxproj
#       renamed:    ACS.xcodeproj/project.xcworkspace/contents.xcworkspacedata -> src/ACS.xcodeproj/project.xcworkspace/contents.xcworkspacedata
#       renamed:    ACS_Prefix.pch -> src/ACS_Prefix.pch
#       renamed:    Classes/ACSAppDelegate.h -> src/Classes/ACSAppDelegate.h
#       renamed:    Classes/ACSAppDelegate.m -> src/Classes/ACSAppDelegate.m
#       renamed:    Classes/BaseUrlConnection.h -> src/Classes/BaseUrlConnection.h
#       renamed:    Classes/BaseUrlConnection.m -> src/Classes/BaseUrlConnection.m
#       renamed:    Classes/InrixApi.h -> src/Classes/InrixApi.h
#       renamed:    Classes/InrixApi.m -> src/Classes/InrixApi.m
#       renamed:    Classes/MKMapView+ZoomLevel.h -> src/Classes/MKMapView+ZoomLevel.h
#       renamed:    Classes/MKMapView+ZoomLevel.m -> src/Classes/MKMapView+ZoomLevel.m
#       renamed:    Classes/Settings.h -> src/Classes/Settings.h
#       renamed:    Classes/TileOverlay.h -> src/Classes/TileOverlay.h
#       renamed:    Classes/TileOverlay.m -> src/Classes/TileOverlay.m
#       renamed:    Classes/TileOverlayView.h -> src/Classes/TileOverlayView.h
#       renamed:    Classes/TileOverlayView.m -> src/Classes/TileOverlayView.m
#       renamed:    Classes/TrafficViewController.h -> src/Classes/TrafficViewController.h
#       renamed:    Classes/TrafficViewController.m -> src/Classes/TrafficViewController.m
#       renamed:    Classes/TrafficViewController.xib -> src/Classes/TrafficViewController.xib
#       renamed:    GDataXMLNode.h -> src/GDataXMLNode.h
#       renamed:    GDataXMLNode.m -> src/GDataXMLNode.m

The instructions say that all lines beginning with a # will be ignored. That means all lines NOT beginning with a # will be included in the resulting commit message. That wasn’t clear to me when I first read that, maybe because that message is in the middle of the buffer. I changed this buffer to look like this:

# This is a combination of 2 commits.
# The first commit's message is:

Move project files to the src directory.

# This is the 2nd commit message:

#Move README back to the root.

# Please enter the commit message for your changes. Lines starting
# with '#' will be ignored, and an empty message aborts the commit.
# Not currently on any branch.
# Changes to be committed:
#   (use "git reset HEAD <file>..." to unstage)
#
#       renamed:    74-location.png -> src/74-location.png
#       renamed:    ACS-Info.plist -> src/ACS-Info.plist
#       renamed:    ACS.xcodeproj/project.pbxproj -> src/ACS.xcodeproj/project.pbxproj
#       renamed:    ACS.xcodeproj/project.xcworkspace/contents.xcworkspacedata -> src/ACS.xcodeproj/project.xcworkspace/contents.xcworkspacedata
#       renamed:    ACS_Prefix.pch -> src/ACS_Prefix.pch
#       renamed:    Classes/ACSAppDelegate.h -> src/Classes/ACSAppDelegate.h
#       renamed:    Classes/ACSAppDelegate.m -> src/Classes/ACSAppDelegate.m
#       renamed:    Classes/BaseUrlConnection.h -> src/Classes/BaseUrlConnection.h
#       renamed:    Classes/BaseUrlConnection.m -> src/Classes/BaseUrlConnection.m
#       renamed:    Classes/InrixApi.h -> src/Classes/InrixApi.h
#       renamed:    Classes/InrixApi.m -> src/Classes/InrixApi.m
#       renamed:    Classes/MKMapView+ZoomLevel.h -> src/Classes/MKMapView+ZoomLevel.h
#       renamed:    Classes/MKMapView+ZoomLevel.m -> src/Classes/MKMapView+ZoomLevel.m
#       renamed:    Classes/Settings.h -> src/Classes/Settings.h
#       renamed:    Classes/TileOverlay.h -> src/Classes/TileOverlay.h
#       renamed:    Classes/TileOverlay.m -> src/Classes/TileOverlay.m
#       renamed:    Classes/TileOverlayView.h -> src/Classes/TileOverlayView.h
#       renamed:    Classes/TileOverlayView.m -> src/Classes/TileOverlayView.m
#       renamed:    Classes/TrafficViewController.h -> src/Classes/TrafficViewController.h
#       renamed:    Classes/TrafficViewController.m -> src/Classes/TrafficViewController.m
#       renamed:    Classes/TrafficViewController.xib -> src/Classes/TrafficViewController.xib
#       renamed:    GDataXMLNode.h -> src/GDataXMLNode.h
#       renamed:    GDataXMLNode.m -> src/GDataXMLNode.m

After saving and quitting the editor, Git prints out what it did:

[detached HEAD 419d987] Move project files to the src directory.
 26 files changed, 0 insertions(+), 0 deletions(-)
 rename 74-location.png => src/74-location.png (100%)
 rename ACS-Info.plist => src/ACS-Info.plist (100%)
 rename {ACS.xcodeproj => src/ACS.xcodeproj}/project.pbxproj (100%)
 rename {ACS.xcodeproj => src/ACS.xcodeproj}/project.xcworkspace/contents.xcworkspacedata (100%)
 rename ACS_Prefix.pch => src/ACS_Prefix.pch (100%)
 rename {Classes => src/Classes}/ACSAppDelegate.h (100%)
 rename {Classes => src/Classes}/ACSAppDelegate.m (100%)
 rename {Classes => src/Classes}/BaseUrlConnection.h (100%)
 rename {Classes => src/Classes}/BaseUrlConnection.m (100%)
 rename {Classes => src/Classes}/InrixApi.h (100%)
 rename {Classes => src/Classes}/InrixApi.m (100%)
 rename {Classes => src/Classes}/MKMapView+ZoomLevel.h (100%)
 rename {Classes => src/Classes}/MKMapView+ZoomLevel.m (100%)
 rename {Classes => src/Classes}/Settings.h (100%)
 rename {Classes => src/Classes}/TileOverlay.h (100%)
 rename {Classes => src/Classes}/TileOverlay.m (100%)
 rename {Classes => src/Classes}/TileOverlayView.h (100%)
 rename {Classes => src/Classes}/TileOverlayView.m (100%)
 rename {Classes => src/Classes}/TrafficViewController.h (100%)
 rename {Classes => src/Classes}/TrafficViewController.m (100%)
 rename {Classes => src/Classes}/TrafficViewController.xib (100%)
 rename GDataXMLNode.h => src/GDataXMLNode.h (100%)
 rename GDataXMLNode.m => src/GDataXMLNode.m (100%)
 rename MainWindow.xib => src/MainWindow.xib (100%)
 rename car_256.png => src/car_256.png (100%)
 rename main.m => src/main.m (100%)
Successfully rebased and updated refs/heads/master.

Here is the result:

$ git log -2
commit 419d987ffbf2c70b1cad664aa2a56281e681268d
Author: David Potter <davidp@example.com>
Date:   Sat Mar 26 15:20:46 2011 -0700

    Move project files to the src directory.

commit 41a6af9de1f0e3fb84ae46c301a0252d0f861f02
Author: David Potter <david@example.com>
Date:   Tue Mar 22 11:35:14 2011 -0700

    Updated API layer

If conflicts occur during this process, you can resolve them and then continue the rebase, like so:

$ git rebase --continue

If you decide you don’t want to continue, you can abort the operation instead:

$ git rebase --abort

You can see the operations that have been performed on the repository using the following command:

$ git reflog --oneline

419d987 HEAD@{0}: rebase -i (squash): Move project files to the src directory.
41a6af9 HEAD@{1}: rebase -i (squash): updating HEAD
553561e HEAD@{2}: checkout: moving from master to 553561e
d43ace6 HEAD@{3}: commit: Move README back to the root.
553561e HEAD@{4}: commit: Move project files to the src directory.
41a6af9 HEAD@{5}: pull origin master: Fast-forward
ce65952 HEAD@{6}: pull origin master: Fast-forward
876b07b HEAD@{7}: pull origin master: Fast-forward
28c415e HEAD@{8}: clone: from git://server/project
Bug in removeOverlay: in MKMapView

I’ve been developing an iPhone app on my job at INRIX that uses MapKit and have run into a number of interesting issues.  One in particular baffled me for some time, and it turns out to be (or at least appear to be) a bug in MKMapView.

The app displays traffic on a map, and on iOS4 it uses an overlay to display the traffic tiles.  As the user moves around or zooms in and out, the traffic tile image must be updated, which means removing the overlay and adding a new one.  This appears to work at most zoom levels until you start zooming in closer.  In those cases, the traffic tile would appear as a big blob – very ugly.

Searching around the net I found a few people that had experienced the same problem.  The work-around is to add a dummy transparent overly.  Sounds silly, but it works.

Here are some code snippets that work for me:

- (void) loadView
{
    // ...
    _mapView = [[MKMapView alloc] init];
    _mapView.delegate = self;
    // ...
    [self.view addSubview: _mapView];
    // ...
    BOOL isOS4orAbove = ([[[UIDevice currentDevice] systemVersion] floatValue] >= 4.0f);
    if (isOS4orAbove)
    {
        // Add a dummy overlay to fix a bug in MKMapView where overlays don't get removed properly.
        // https://devforums.apple.com/message/307581
        MKPolyline * dummyOverlay = [[MKPolyline alloc] init];
        [_mapView addOverlay: dummyOverlay];
        [dummyOverlay release];
    }
    // ...
}
- (MKOverlayView *) mapView: (MKMapView *) mapView viewForOverlay: (id <MKOverlay>) overlay
{
    if ([overlay isKindOfClass: [TileOverlay class]])
    {
        // Return view for traffic tile overlay.
    }
    else if ([overlay isKindOfClass: [MKPolyline class]])
    {
        // This is for a dummy overlay to work around a problem with overlays
        // not getting removed by the map view even though we asked for it to
        // be removed.
        MKOverlayView * dummyView = [[[MKOverlayView alloc] initWithOverlay: overlay] autorelease];
        dummyView.alpha = 0.0;
        return dummyView;
    }
    else
    {
        return nil;
    }
}

The forum post that led me to this solution can be found here.  This appears to be a bug in MapKit.  I’d be interested in hearing if others have encountered this problem and how you solved it.

Debugging .NET Web Services

I’ve been spending a lot of time lately debugging web services and I’ve been getting frustrated with the client timing out on me, so I finally buckled down and figured out how to prevent it.

Web Services consist of two parts – a client and a server.  The client is implemented as a class derived from System.Web.Services.Protocols.WebClientProtocol, e.g. through SoapHttpClientProtocol or HttpWebClientProtocol.

When a client calls a method on a web service, an asynchronous message is sent to the web service and the client waits for it to complete.  The client doesn’t wait forever, however.  The default timeout is 100 seconds (100,000 ms).  To change this, you must set the Timeout property on the web service client object, like so:

MyWebService client = new MyWebService();
client.Timeout = System.Threading.Timeout.Infinite;

The Timeout property contains a value representing the number of milliseconds to wait for calls to return before throwing a System.Net.WebException exception.  To prevent it from timing out altogether, specify either -1 or System.Threading.Timeout.Infinite.

Reources

Unexpected precompiled header error C1859 on Windows 7

I’m one of the few developers at my company that is using Windows 7.  Most of the projects in the solution I am working with are C#, but some are C++.  Periodically I get the following error building every single source file in the C++ project on my machine:

fatal error C1859: 'Debug\MyProject.pch' unexpected precompiled header error, simply rerunning the compiler might fix this problem

Nothing I did seemed to solve the problem short of rebooting, which seems to be a common experience (see here and here).  Today I stumbled upon a post on the Visual C++ Team Blog that explains what is going on.

It turns out that the anti-malware improvements in Windows 7 are the culprit.  PCH files are implemented basically as a memory dump, including pointers.  This worked fine on previous versions of Windows, but Windows 7 upped the ante making this approach unworkable.

The new behavior that fixes this problem is available in Visual Studio 2010.  The Visual C++ team has also released a hotfix for Visual Studio 2008 SP1 with the fix.

Resources

Force .NET application to run in 32-bit process on 64-bit Windows

64-bit Windows has been around for a number of years, but there are a number of quirks that make it more difficult to work with than 32-bit Windows.  At my day job, I’m developing C# software on 64-bit Windows 7 using Visual Studio 2008 and I have to use some 32-bit DLLs provided by a third party.  We wrote some code to wrap these DLLs in C++, and I needed to debug into those wrappers.  When I tried to set a breakpoint in the C++ source code, instead of getting a filled in circle on the line indicating that the breakpoint will be hit, an empty circle with a yellow triangle in the corner is displayed.  Hovering over the icon displays a message indicating where the breakpoint is set and some text at the bottom explaining why the yellow triangle is being displayed:

The breakpoint will not currently be hit. No symbols have been loaded for this document.

Clearly this was due to trying to load a 32-bit DLL in a 64-bit process.  So the question is, how do you force a .NET application to run in a 32-bit process on 64-bit Windows?  Gabriel Schenker does a very nice job of describing the various ways of doing this.  I’ll summarize them here.

Set the platform target

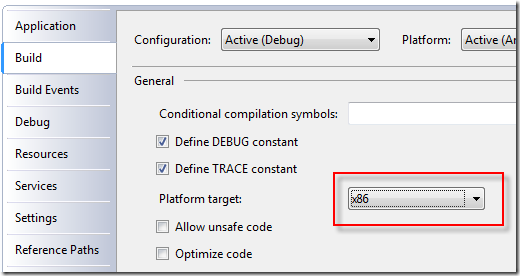
When building a managed application in Visual Studio, you can specify the target platform to be either x86 or x64.

Visual Studio Platform Target x86

Setting this to x86 will force the target assembly (.dll or .exe) to be built as a 32-bit application, but if the assembly that loads the target assembly is running in a 64-bit process, it will fail to load your assembly.  Therefore, you need to make sure that if your application needs to load a 32-bit DLL that it is running in a 32-bit process.

Note that it is not required that you specify x86 to allow your assembly to be loaded in a 32-bit process.  If you specify Any CPU it can be loaded in either a 32-bit or a 64-bit process.

Force IIS to create a 32-bit app pool worker process

If your application is running as a web app, meaning it is running in an IIS app pool worker process, you’ll want that worker process (w3wp.exe) to be a 32-bit process.  That can be specified in the advanced settings of the app pool:

  1. Select the app pool for your web app.
  2. Click Advanced Settings… under Edit Application Pool on the right.
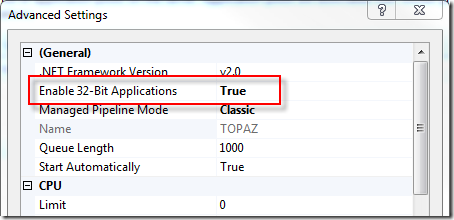
  3. Change the value of Enable 32-Bit Applications under (General) to True.

IIS Advanced Settings Enable 32-Bit Applications

Note that the word “Enable” in the setting doesn’t mean “allow” as in “allow either 32- or 64-bit applications.”  It actually means “force” as in “force the worker process to run in 32-bit mode so that 32-bit applications are supported.”  This means that the app pool worker process will always be launched as a 32-bit process when this setting has a value of True.  Setting it to False will launch a 64-bit app pool worker process.

Note that when an app pool worker process is started, it shows up in the Image Name column on the Processes tab in Task Manager as w3wp.exe.  When the Enable 32-Bit Applications setting has a value of True, it will be listed as w3wp.exe *32.

Modify the 32-bit flag in the assembly

This solution is intended for use by those that are not able to modify the build options.  The assembly header has a number of flags including one called 32BIT.  The CorFlags conversion tool allows you to modify the values of various flags, including the 32BIT flag.  You can use the following command to force the assembly to require a 32-bit process:

CorFlags MyAssembly.exe /32BIT+

The following command will clear the flag:

CorFlags MyAssembly.exe /32BIT-

Create a wrapper application

This solution allows you to make sure that you are running an application in a process with of a particular “bitness.”  Gabriel has a really good solution to this with source code in his post.

Additional Note

In my current position I end up having to attach to an existing w3wp.exe process to debug the web service.  Some of the web services are managed and some are managed/native.  Don’t forget to change the Attach to settings to include both Managed code and Native code.  However, this will only work when attaching to 32-bit processes.  Attempting to attach to a 64-bit process in this way will treat you to the following message:

Unable to attach to the process. Mixed mode debugging is not supported on Windows 64-bit platforms.

Resources

Removing trailing whitespace in Visual Studio

A pet peeve of mine is whitespace (spaces and tabs) at the end of lines in source code.  I used the SourceInsight editor when I worked at Microsoft which has a built-in feature (among other terrific features) to strip trailing whitespace when you save.  Visual Studio has plenty of other features that I can’t live without, so it was time to figure out how to add it there.

A decent solution is to add a subroutine to the EnvironmentEvents Module.  The articles I read made the assumption that anyone reading it would know where to find that.  I didn’t, so it took me some extra time to implement the feature.

Find EnvironmentEvents Module

The EnvironmentEvents Module is a macro module that is part of your Visual Studio environment and is accessible regardless of which project is loaded.  To edit that module, you need to bring up the Macros IDE, which can be launched at Tools » Macros » Macros IDE, or by pressing Alt+F11.

Macros IDE

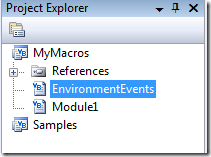
In the Macros IDE you will see two entries in the Project Explorer (unless you’ve been here before and have been adding macros on your own):  MyMacros and Samples.  Double-click on MyMacros.  This will show you three entries:  References, EnvironmentEvents, and Module1.

Macros IDE Project Explorer - EnvironmentEvents

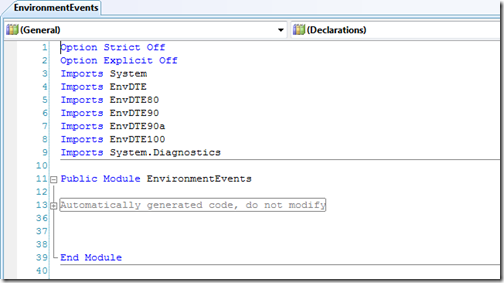
Double click on EnvironmentEvents.  You will now see the current contents of the EnvironmentEvents module.

Default EnvironmentEvents

DocumentEvents_DocumentSaved Subroutine

Now we come to the meat of the solution.  The idea is to implement the DocumentEvents_DocumentSaved subroutine to remove trailing whitespace.  This subroutine is called whenever a request is made to save a document.

Private Sub DocumentEvents_Documents(ByVal document As EnvDTE.Document) _
                                     Handles DocumentEvents.DocumentSaved
    Try
        ' Remove all the trailing whitespaces.
        If vsFindResult.vsFindResultReplaced = _
            DTE.Find.FindReplace( _
                            vsFindAction.vsFindActionReplaceAll, _
                            “{:b}+$”, _
                            vsFindOptions.vsFindOptionsRegularExpression, _
                            String.Empty, _
                            vsFindTarget.vsFindTargetFiles, _
                            document.FullName, , _
                            vsFindResultsLocation.vsFindResultsNone) Then
            document.Save()
        End If
    Catch ex As Exception
        MsgBox(ex.Message, MsgBoxStyle.OkOnly, “Trim Whitespace exception”)
    End Try
End Sub

Once you’ve saved this, it will be immediately available to Visual Studio, whether it is open or not.

This subroutine searches for all instances of trailing whitespace (spaces and tabs) and replaces it with the empty string.  It works when you save an individual file and when you do a Save All.  If an error occurs in the FindReplace method, a message box will be displayed.

Thanks to Michael Urman, who posted this solution on StackOverflow.com (May 19 response).

Resources

Web application times out when debugging

I’ve been working on debugging the existing web applications my new company has developed.  I had everything set up, with the appropriate web applications created and breakpoints set, but after about 90 seconds Visual Studio would return to its non-debugging state.

It turns out that as of IIS6 (I’m using IIS 7 on Windows 7), IIS now pings worker processes to make sure it is still responsive, and if not the worker process is terminated.  There is a setting, however, to control this on the app pool.

IIS 7 App Pool Advanced Settings - Ping

  1. Select the app pool for your application.  This is one of the reasons why specifying a separate app pool for each web application is a good idea.
  2. Bring up Advanced Settings.
  3. Scroll down to the Process Model section.
  4. Change the value of the Ping Enabled setting to False.  Alternately you could change the Ping Maximum Response Time (seconds) setting to a higher value, but you’ll be limited in the amount of time you have to debug, so I don’t recommend that.

JohanS has a couple of really good articles on this, which go into more detail.

Resources