Category Archives: System Admin

MySQL issue installing Gerrit on Snow Leopard Server

I spent more time than I wanted installing Gerrit on our Snow Leopard Server at work so that we could streamline code reviews.  I’ve found dealing with diffs in email to be rather inconvenient, so I’m hoping that Gerrit will be a big help.

As I went through the process of installing Gerrit, I hit a speed bump at the end of the init process where it couldn’t create a required function (nextval_account_id()).

Here’s a log of what happened:

$ java -jar gerrit.war init -d /Library/Gerrit/

*** Gerrit Code Review 2.1.6.1
***

*** Git Repositories
***

Location of Git repositories   [/Volumes/Data/src/git]:
Import existing repositories   [Y/n]?

*** SQL Database
***

Database server type           [MYSQL/?]:
Server hostname                [localhost]:
Server port                    [(MYSQL default)]:
Database name                  [reviewdb]:
Database username              [gerrit2]:
Change gerrit2's password      [y/N]?

*** User Authentication
***

Authentication method          [OPENID/?]:

*** Email Delivery
***

SMTP server hostname           [exchsrvr]:
SMTP server port               [(default)]:
SMTP encryption                [NONE/?]:
SMTP username                  [devbuilder]:
Change devbuilder's password   [y/N]?

*** Container Process
***

Run as                         [devbuilder]:
Java runtime                   [/System/Library/Java/JavaVirtualMachines/1.6.0.jdk/Contents/Home]:
Upgrade /Library/Gerrit/bin/gerrit.war [Y/n]?
Copying gerrit.war to /Library/Gerrit/bin/gerrit.war

*** SSH Daemon
***

Listen on address              [*]:
Listen on port                 [29418]:

*** HTTP Daemon
***

Behind reverse proxy           [y/N]?
Use SSL (https://)             [y/N]?
Listen on address              [*]:
Listen on port                 [8081]:
Canonical URL                  [http://myserver.local:8081/]:

Exception in thread "main" com.google.gwtorm.client.OrmException: Error in mysql_nextval.sql:
CREATE FUNCTION nextval_account_id ()
  RETURNS BIGINT
  LANGUAGE SQL
  NOT DETERMINISTIC
  MODIFIES SQL DATA
BEGIN
  INSERT INTO account_id (s) VALUES (NULL);
  DELETE FROM account_id WHERE s = LAST_INSERT_ID();
  RETURN LAST_INSERT_ID();
END;

	at com.google.gerrit.server.schema.ScriptRunner.run(ScriptRunner.java:55)
	at com.google.gerrit.server.schema.SchemaCreator.create(SchemaCreator.java:103)
	at com.google.gerrit.server.schema.SchemaUpdater.update(SchemaUpdater.java:52)
	at com.google.gerrit.pgm.Init$SiteRun.upgradeSchema(Init.java:190)
	at com.google.gerrit.pgm.Init.run(Init.java:85)
	at com.google.gerrit.pgm.util.AbstractProgram.main(AbstractProgram.java:76)
	at sun.reflect.NativeMethodAccessorImpl.invoke0(Native Method)
	at sun.reflect.NativeMethodAccessorImpl.invoke(NativeMethodAccessorImpl.java:39)
	at sun.reflect.DelegatingMethodAccessorImpl.invoke(DelegatingMethodAccessorImpl.java:25)
	at java.lang.reflect.Method.invoke(Method.java:597)
	at com.google.gerrit.launcher.GerritLauncher.invokeProgram(GerritLauncher.java:155)
	at com.google.gerrit.launcher.GerritLauncher.mainImpl(GerritLauncher.java:89)
	at com.google.gerrit.launcher.GerritLauncher.main(GerritLauncher.java:47)
	at Main.main(Main.java:25)
Caused by: java.sql.SQLException: This function has none of DETERMINISTIC, NO SQL, or READS SQL DATA in its declaration and binary logging is enabled (you *might* want to use the less safe log_bin_trust_function_creators variable)
	at com.mysql.jdbc.SQLError.createSQLException(SQLError.java:1055)
	at com.mysql.jdbc.SQLError.createSQLException(SQLError.java:956)
	at com.mysql.jdbc.MysqlIO.checkErrorPacket(MysqlIO.java:3558)
	at com.mysql.jdbc.MysqlIO.checkErrorPacket(MysqlIO.java:3490)
	at com.mysql.jdbc.MysqlIO.sendCommand(MysqlIO.java:1959)
	at com.mysql.jdbc.MysqlIO.sqlQueryDirect(MysqlIO.java:2109)
	at com.mysql.jdbc.ConnectionImpl.execSQL(ConnectionImpl.java:2642)
	at com.mysql.jdbc.ConnectionImpl.execSQL(ConnectionImpl.java:2571)
	at com.mysql.jdbc.StatementImpl.execute(StatementImpl.java:782)
	at com.mysql.jdbc.StatementImpl.execute(StatementImpl.java:625)
	at com.google.gerrit.server.schema.ScriptRunner.run(ScriptRunner.java:53)
	... 13 more

The solution is to make one change to the MySQL configuration before initializing Gerrit:

SET GLOBAL log_bin_trust_function_creators=1;

Thanks to Anthony on the Google Group for Gerrit for the answer.

Mount a Mac volume on a Mac from the command line

I still feel like a noob on a Mac even though I’ve been working professionally on one for almost 9 months.  Today I needed to copy files from one Mac to another and I wanted to do that all from the command line.  One way to do that is to use the mount command.  Here are the steps:

cd /Volumes
mkdir remotedisk
mount -t afp afp://remotehost/shareddir remotedisk

The trick here is to specify the file system (-t afp) and to specify the remote shared folder with the correct syntax (afp://remotehost/shareddir).

I found the man pages for mount to be less than helpful for discovering this.  However, I did find a web page that helped.

Adding a separator to the Mac OS X Dock

I’m now developing iPhone apps at work which means developing on a Mac.  It’s quite a shift from Windows, so I’ve been spending time learning the ins and outs to become comfortable with the platform.

One of the things I discovered is that the Dock doesn’t provide a way in the UI to add spacers (dividers) between application tiles.  There are two ways to do this.

Add a dummy application to the Dock

This solution is really simple. Brandon Kelly wrote a very simple application Dock Dividers.  Dock Dividers is simple a collection of do-nothing applications with an application image that looks like a divider.  All you do is simply drag an application to the place in the dock where you want a spacer.  The biggest issue is that you have to make sure you don’t drag the same application to the Dock more than once.

Dock Divider

Use the defaults program from Terminal to add a spacer

The Dock application actually does support the concept of a spacer tile.  Apple just chose not to expose it in the UI.  To add a spacer tile, type the following sequence of commands in a Terminal window:

defaults write com.apple.dock persistent-apps -array-add '{ "tile-type" = "spacer-tile"; }
killall Dock

You can add as many spacer tiles as you want.  Once you’re done adding them, execute the killall command to restart the Dock.

Dock Separator

To remove a spacer tile, simply drag it from the Dock, release it somewhere else, and watch it go up in a poof of smoke.

The biggest issue I see with this method is that the spacer tile is simply a space on the dock.  You don’t get to specify an image to make it look nicer.  Hmm… as I think about this, I’m sure there is a way.  Let me know if you figure it out.

Resources

Force .NET application to run in 32-bit process on 64-bit Windows

64-bit Windows has been around for a number of years, but there are a number of quirks that make it more difficult to work with than 32-bit Windows.  At my day job, I’m developing C# software on 64-bit Windows 7 using Visual Studio 2008 and I have to use some 32-bit DLLs provided by a third party.  We wrote some code to wrap these DLLs in C++, and I needed to debug into those wrappers.  When I tried to set a breakpoint in the C++ source code, instead of getting a filled in circle on the line indicating that the breakpoint will be hit, an empty circle with a yellow triangle in the corner is displayed.  Hovering over the icon displays a message indicating where the breakpoint is set and some text at the bottom explaining why the yellow triangle is being displayed:

The breakpoint will not currently be hit. No symbols have been loaded for this document.

Clearly this was due to trying to load a 32-bit DLL in a 64-bit process.  So the question is, how do you force a .NET application to run in a 32-bit process on 64-bit Windows?  Gabriel Schenker does a very nice job of describing the various ways of doing this.  I’ll summarize them here.

Set the platform target

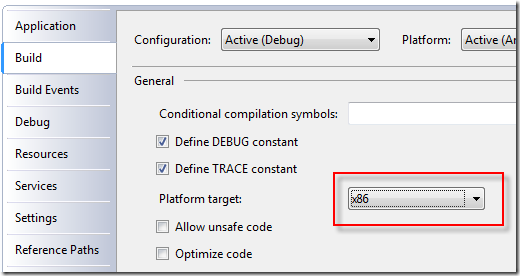
When building a managed application in Visual Studio, you can specify the target platform to be either x86 or x64.

Visual Studio Platform Target x86

Setting this to x86 will force the target assembly (.dll or .exe) to be built as a 32-bit application, but if the assembly that loads the target assembly is running in a 64-bit process, it will fail to load your assembly.  Therefore, you need to make sure that if your application needs to load a 32-bit DLL that it is running in a 32-bit process.

Note that it is not required that you specify x86 to allow your assembly to be loaded in a 32-bit process.  If you specify Any CPU it can be loaded in either a 32-bit or a 64-bit process.

Force IIS to create a 32-bit app pool worker process

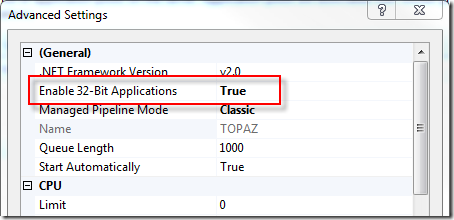
If your application is running as a web app, meaning it is running in an IIS app pool worker process, you’ll want that worker process (w3wp.exe) to be a 32-bit process.  That can be specified in the advanced settings of the app pool:

  1. Select the app pool for your web app.
  2. Click Advanced Settings… under Edit Application Pool on the right.
  3. Change the value of Enable 32-Bit Applications under (General) to True.

IIS Advanced Settings Enable 32-Bit Applications

Note that the word “Enable” in the setting doesn’t mean “allow” as in “allow either 32- or 64-bit applications.”  It actually means “force” as in “force the worker process to run in 32-bit mode so that 32-bit applications are supported.”  This means that the app pool worker process will always be launched as a 32-bit process when this setting has a value of True.  Setting it to False will launch a 64-bit app pool worker process.

Note that when an app pool worker process is started, it shows up in the Image Name column on the Processes tab in Task Manager as w3wp.exe.  When the Enable 32-Bit Applications setting has a value of True, it will be listed as w3wp.exe *32.

Modify the 32-bit flag in the assembly

This solution is intended for use by those that are not able to modify the build options.  The assembly header has a number of flags including one called 32BIT.  The CorFlags conversion tool allows you to modify the values of various flags, including the 32BIT flag.  You can use the following command to force the assembly to require a 32-bit process:

CorFlags MyAssembly.exe /32BIT+

The following command will clear the flag:

CorFlags MyAssembly.exe /32BIT-

Create a wrapper application

This solution allows you to make sure that you are running an application in a process with of a particular “bitness.”  Gabriel has a really good solution to this with source code in his post.

Additional Note

In my current position I end up having to attach to an existing w3wp.exe process to debug the web service.  Some of the web services are managed and some are managed/native.  Don’t forget to change the Attach to settings to include both Managed code and Native code.  However, this will only work when attaching to 32-bit processes.  Attempting to attach to a 64-bit process in this way will treat you to the following message:

Unable to attach to the process. Mixed mode debugging is not supported on Windows 64-bit platforms.

Resources