Author Archives: David Potter

Mount a Mac volume on a Mac from the command line

I still feel like a noob on a Mac even though I’ve been working professionally on one for almost 9 months.  Today I needed to copy files from one Mac to another and I wanted to do that all from the command line.  One way to do that is to use the mount command.  Here are the steps:

cd /Volumes
mkdir remotedisk
mount -t afp afp://remotehost/shareddir remotedisk

The trick here is to specify the file system (-t afp) and to specify the remote shared folder with the correct syntax (afp://remotehost/shareddir).

I found the man pages for mount to be less than helpful for discovering this.  However, I did find a web page that helped.

Bug in removeOverlay: in MKMapView

I’ve been developing an iPhone app on my job at INRIX that uses MapKit and have run into a number of interesting issues.  One in particular baffled me for some time, and it turns out to be (or at least appear to be) a bug in MKMapView.

The app displays traffic on a map, and on iOS4 it uses an overlay to display the traffic tiles.  As the user moves around or zooms in and out, the traffic tile image must be updated, which means removing the overlay and adding a new one.  This appears to work at most zoom levels until you start zooming in closer.  In those cases, the traffic tile would appear as a big blob – very ugly.

Searching around the net I found a few people that had experienced the same problem.  The work-around is to add a dummy transparent overly.  Sounds silly, but it works.

Here are some code snippets that work for me:

- (void) loadView
{
    // ...
    _mapView = [[MKMapView alloc] init];
    _mapView.delegate = self;
    // ...
    [self.view addSubview: _mapView];
    // ...
    BOOL isOS4orAbove = ([[[UIDevice currentDevice] systemVersion] floatValue] >= 4.0f);
    if (isOS4orAbove)
    {
        // Add a dummy overlay to fix a bug in MKMapView where overlays don't get removed properly.
        // https://devforums.apple.com/message/307581
        MKPolyline * dummyOverlay = [[MKPolyline alloc] init];
        [_mapView addOverlay: dummyOverlay];
        [dummyOverlay release];
    }
    // ...
}
- (MKOverlayView *) mapView: (MKMapView *) mapView viewForOverlay: (id <MKOverlay>) overlay
{
    if ([overlay isKindOfClass: [TileOverlay class]])
    {
        // Return view for traffic tile overlay.
    }
    else if ([overlay isKindOfClass: [MKPolyline class]])
    {
        // This is for a dummy overlay to work around a problem with overlays
        // not getting removed by the map view even though we asked for it to
        // be removed.
        MKOverlayView * dummyView = [[[MKOverlayView alloc] initWithOverlay: overlay] autorelease];
        dummyView.alpha = 0.0;
        return dummyView;
    }
    else
    {
        return nil;
    }
}

The forum post that led me to this solution can be found here.  This appears to be a bug in MapKit.  I’d be interested in hearing if others have encountered this problem and how you solved it.

iPhone Utilities for your Mac or PC

I stumbled upon a couple of really good iPhone utilities for the Mac and PC from MacroplantiPhone Explorer and Phone Disk.  These apps allow you to see what is on your iPhone, iPod Touch, or iPad – pretty cool.  They’re not quite as useful if the device isn’t jail-broken, but they’re still useful.

iPhoneExplorer PhoneDisk

For example, they will both allow you view the app and media files that are on your device.  They both allow you to copy files to and from your device as well.  iPhone Explorer allows you to see all the files related to your apps as well while Phone Disk allows you to delete files on your device.  iPhone Explorer provides a custom UI for viewing the contents whereas Phone Disk mounts the device as a disk, just like a USB flash drive.

Macroplant provides iPhone Explorer free of charge, while normally they charge for Phone Disk.  Until December 2010, however, they are offering it for free.

Resources

Adding a separator to the Mac OS X Dock

I’m now developing iPhone apps at work which means developing on a Mac.  It’s quite a shift from Windows, so I’ve been spending time learning the ins and outs to become comfortable with the platform.

One of the things I discovered is that the Dock doesn’t provide a way in the UI to add spacers (dividers) between application tiles.  There are two ways to do this.

Add a dummy application to the Dock

This solution is really simple. Brandon Kelly wrote a very simple application Dock Dividers.  Dock Dividers is simple a collection of do-nothing applications with an application image that looks like a divider.  All you do is simply drag an application to the place in the dock where you want a spacer.  The biggest issue is that you have to make sure you don’t drag the same application to the Dock more than once.

Dock Divider

Use the defaults program from Terminal to add a spacer

The Dock application actually does support the concept of a spacer tile.  Apple just chose not to expose it in the UI.  To add a spacer tile, type the following sequence of commands in a Terminal window:

defaults write com.apple.dock persistent-apps -array-add '{ "tile-type" = "spacer-tile"; }
killall Dock

You can add as many spacer tiles as you want.  Once you’re done adding them, execute the killall command to restart the Dock.

Dock Separator

To remove a spacer tile, simply drag it from the Dock, release it somewhere else, and watch it go up in a poof of smoke.

The biggest issue I see with this method is that the spacer tile is simply a space on the dock.  You don’t get to specify an image to make it look nicer.  Hmm… as I think about this, I’m sure there is a way.  Let me know if you figure it out.

Resources

Debugging .NET Web Services

I’ve been spending a lot of time lately debugging web services and I’ve been getting frustrated with the client timing out on me, so I finally buckled down and figured out how to prevent it.

Web Services consist of two parts – a client and a server.  The client is implemented as a class derived from System.Web.Services.Protocols.WebClientProtocol, e.g. through SoapHttpClientProtocol or HttpWebClientProtocol.

When a client calls a method on a web service, an asynchronous message is sent to the web service and the client waits for it to complete.  The client doesn’t wait forever, however.  The default timeout is 100 seconds (100,000 ms).  To change this, you must set the Timeout property on the web service client object, like so:

MyWebService client = new MyWebService();
client.Timeout = System.Threading.Timeout.Infinite;

The Timeout property contains a value representing the number of milliseconds to wait for calls to return before throwing a System.Net.WebException exception.  To prevent it from timing out altogether, specify either -1 or System.Threading.Timeout.Infinite.

Reources

Unexpected precompiled header error C1859 on Windows 7

I’m one of the few developers at my company that is using Windows 7.  Most of the projects in the solution I am working with are C#, but some are C++.  Periodically I get the following error building every single source file in the C++ project on my machine:

fatal error C1859: 'Debug\MyProject.pch' unexpected precompiled header error, simply rerunning the compiler might fix this problem

Nothing I did seemed to solve the problem short of rebooting, which seems to be a common experience (see here and here).  Today I stumbled upon a post on the Visual C++ Team Blog that explains what is going on.

It turns out that the anti-malware improvements in Windows 7 are the culprit.  PCH files are implemented basically as a memory dump, including pointers.  This worked fine on previous versions of Windows, but Windows 7 upped the ante making this approach unworkable.

The new behavior that fixes this problem is available in Visual Studio 2010.  The Visual C++ team has also released a hotfix for Visual Studio 2008 SP1 with the fix.

Resources

SyntaxHighlighter Evolved WordPress Plugin

I’m in the process of moving my technical blog from my personal site to this site, and as part of that move, I wanted to improve the look of code in the articles I write.  I started with a Microsoft Live Writer plugin called Paste As Visual Studio Code.  It’s a decent plugin, but it has some display quirks and it embeds a lot of raw HTML in my posts.  So, I continued my search.

Today I stumbled upon a WordPress plugin called SyntaxHighlighter Evolved by Alex, aka Viper007Bond, at Automattic (the folks who develop WordPress).  It uses the SyntaxHighlighter JavaScript package by Alex Gorbatchev do the highlighting.  This is the same plugin that is used on the wordpress.com site for posting source code.

This plugin makes adding source code to your blog post extremely simple.  It uses WordPress shortcodes to allow you to indicate language and a host of other settings, like this:

[sourcecode language="css"]
your code here
[/sourcecode]

You can abbreviate the shortcode to just the name of the language, like so:

[css]
your code here
[/css]

For example, this code will display the following C#:

[csharp]foreach (string name in Names)
    Console.WriteLine("Name = {0}", name);[/csharp]


foreach (string name in Names)
    Console.WriteLine("Name = {0}", name);

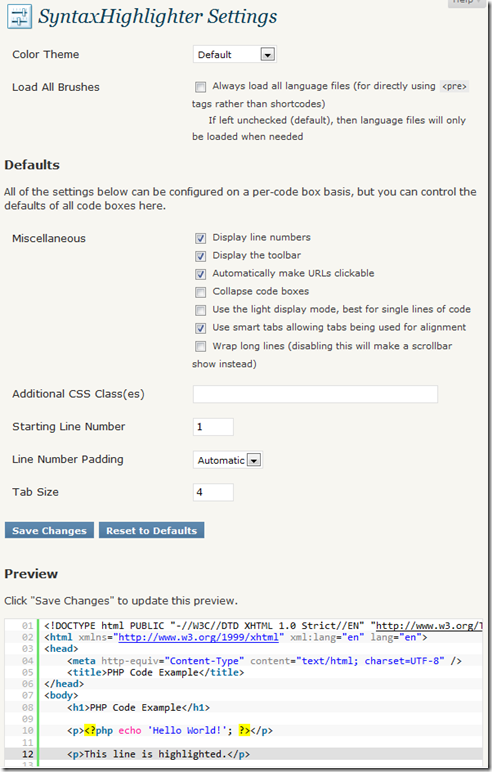
The plugin provides a rich settings page for specifying defaults as well as various styles.

SyntaxHighighter Settings

You can find the set of language aliases on Alex Gorbatchev’s website.  Note that only language aliases with letters, numbers, and dashes are supported by the plugin.

Additionally, you can override parameters for a particular instance of code right in the shortcode, like so:

[text light="true"]Fatal error occurred when blah blah blah[/text]

The parameters that can be specified this way are listed on the settings page for the plugin.  Here is a summary:

Parameter Description Examples
autolinks Toggle automatic URL linking. autolinks="false"
classname Add an additional CSS class to the code box. classname="samplecode"
collapse Toggle collapsing the code box by default, requiring a click to expand it. Good for large code posts. collapse="true"
firstline An interger specifying what number the first line should be (for the line numbering). firstline="152"
gutter Toggle the left-side line numbering. gutter="false"
highlight A comma-sperated list of line numbers to highlight. highlight="13,21"
htmlscript Toggle highlighting any extra HTML/XML. Good for when you’re mixing HTML/XML with another language, such as having PHP inside an HTML web page. The above preview has it enabled for example. This only works with certain languages. htmlscript="true"
light Toggle light mode which disables the gutter and toolbar all at once. light="true"
padlinenumbers Controls line number padding. Valid values are false (no padding), true (automatic padding), or an integer (forced padding). padlinenumbers="false" padlinenumbers="3"
toolbar Toggle the toolbar containing the helpful buttons. toolbar="false"
wraplines Toggle line wrapping. wraplines="false"

Notes and Room for Improvement

All in all, this is a very rich plugin that does what a plugin should do – make the creation of posts easier.  However, it isn’t perfect.  There are two issues I’ve run up against, but neither one is a showstopper.

  1. The prescribed method for including examples of the shortcode in a post is to just do it.  Viper007Bond says that the plugin won’t parse instances of the shortcode within another instance of a different shortcode.  This will typically only be a problem for the text shortcode.  What you can do is something like this:
    [code lang="text"][text]Some text you want to show as code.[/text][/code]
  2. The plugin modifies the behavior of the Visual Editor to recognize its shortcode and modifies the look of text within its shortcodes.  This is a very nice feature.  However, when you switch from Visual mode to HTML mode, you cannot see why the text looks different between the two modes.  One of the things I really like about HTML mode is that it allows me to check the actual HTML.  I know, WordPress adds its own HTML before actually displaying a post or page, but the rules are few and fairly well understood.  Maybe I’ll just add another rule and stop whining 🙂

Even with these issues, I’ll be adding this plugin to my stable of plugins I routinely add to any blog on which code is published.

Resources

Force .NET application to run in 32-bit process on 64-bit Windows

64-bit Windows has been around for a number of years, but there are a number of quirks that make it more difficult to work with than 32-bit Windows.  At my day job, I’m developing C# software on 64-bit Windows 7 using Visual Studio 2008 and I have to use some 32-bit DLLs provided by a third party.  We wrote some code to wrap these DLLs in C++, and I needed to debug into those wrappers.  When I tried to set a breakpoint in the C++ source code, instead of getting a filled in circle on the line indicating that the breakpoint will be hit, an empty circle with a yellow triangle in the corner is displayed.  Hovering over the icon displays a message indicating where the breakpoint is set and some text at the bottom explaining why the yellow triangle is being displayed:

The breakpoint will not currently be hit. No symbols have been loaded for this document.

Clearly this was due to trying to load a 32-bit DLL in a 64-bit process.  So the question is, how do you force a .NET application to run in a 32-bit process on 64-bit Windows?  Gabriel Schenker does a very nice job of describing the various ways of doing this.  I’ll summarize them here.

Set the platform target

When building a managed application in Visual Studio, you can specify the target platform to be either x86 or x64.
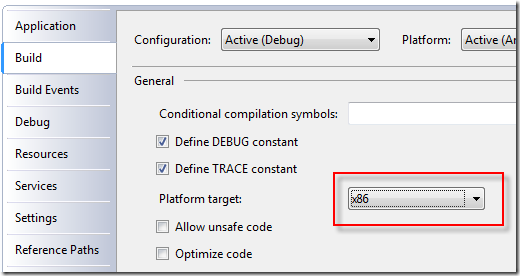
Visual Studio Platform Target x86

Setting this to x86 will force the target assembly (.dll or .exe) to be built as a 32-bit application, but if the assembly that loads the target assembly is running in a 64-bit process, it will fail to load your assembly.  Therefore, you need to make sure that if your application needs to load a 32-bit DLL that it is running in a 32-bit process.

Note that it is not required that you specify x86 to allow your assembly to be loaded in a 32-bit process.  If you specify Any CPU it can be loaded in either a 32-bit or a 64-bit process.

Force IIS to create a 32-bit app pool worker process

If your application is running as a web app, meaning it is running in an IIS app pool worker process, you’ll want that worker process (w3wp.exe) to be a 32-bit process.  That can be specified in the advanced settings of the app pool:

  1. Select the app pool for your web app.
  2. Click Advanced Settings… under Edit Application Pool on the right.
  3. Change the value of Enable 32-Bit Applications under (General) to True.
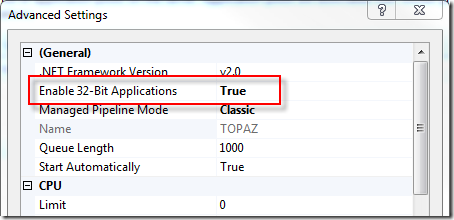
IIS Advanced Settings Enable 32-Bit Applications

Note that the word “Enable” in the setting doesn’t mean “allow” as in “allow either 32- or 64-bit applications.”  It actually means “force” as in “force the worker process to run in 32-bit mode so that 32-bit applications are supported.”  This means that the app pool worker process will always be launched as a 32-bit process when this setting has a value of True.  Setting it to False will launch a 64-bit app pool worker process.

Note that when an app pool worker process is started, it shows up in the Image Name column on the Processes tab in Task Manager as w3wp.exe.  When the Enable 32-Bit Applications setting has a value of True, it will be listed as w3wp.exe *32.

Modify the 32-bit flag in the assembly

This solution is intended for use by those that are not able to modify the build options.  The assembly header has a number of flags including one called 32BIT.  The CorFlags conversion tool allows you to modify the values of various flags, including the 32BIT flag.  You can use the following command to force the assembly to require a 32-bit process:

CorFlags MyAssembly.exe /32BIT+

The following command will clear the flag:

CorFlags MyAssembly.exe /32BIT-

Create a wrapper application

This solution allows you to make sure that you are running an application in a process with of a particular “bitness.”  Gabriel has a really good solution to this with source code in his post.

Additional Note

In my current position I end up having to attach to an existing w3wp.exe process to debug the web service.  Some of the web services are managed and some are managed/native.  Don’t forget to change the Attach to settings to include both Managed code and Native code.  However, this will only work when attaching to 32-bit processes.  Attempting to attach to a 64-bit process in this way will treat you to the following message:

Unable to attach to the process. Mixed mode debugging is not supported on Windows 64-bit platforms.

Resources

Removing trailing whitespace in Visual Studio

A pet peeve of mine is whitespace (spaces and tabs) at the end of lines in source code.  I used the SourceInsight editor when I worked at Microsoft which has a built-in feature (among other terrific features) to strip trailing whitespace when you save.  Visual Studio has plenty of other features that I can’t live without, so it was time to figure out how to add it there.

A decent solution is to add a subroutine to the EnvironmentEvents Module.  The articles I read made the assumption that anyone reading it would know where to find that.  I didn’t, so it took me some extra time to implement the feature.

Find EnvironmentEvents Module

The EnvironmentEvents Module is a macro module that is part of your Visual Studio environment and is accessible regardless of which project is loaded.  To edit that module, you need to bring up the Macros IDE, which can be launched at Tools » Macros » Macros IDE, or by pressing Alt+F11.

Macros IDE

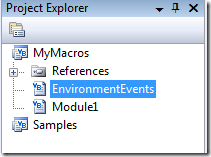
In the Macros IDE you will see two entries in the Project Explorer (unless you’ve been here before and have been adding macros on your own):  MyMacros and Samples.  Double-click on MyMacros.  This will show you three entries:  References, EnvironmentEvents, and Module1.

Macros IDE Project Explorer - EnvironmentEvents

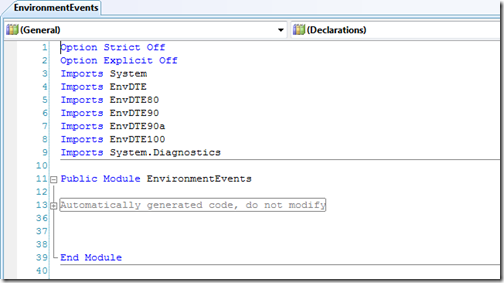
Double click on EnvironmentEvents.  You will now see the current contents of the EnvironmentEvents module.

Default EnvironmentEvents

DocumentEvents_DocumentSaved Subroutine

Now we come to the meat of the solution.  The idea is to implement the DocumentEvents_DocumentSaved subroutine to remove trailing whitespace.  This subroutine is called whenever a request is made to save a document.

Private Sub DocumentEvents_Documents(ByVal document As EnvDTE.Document) _
                                     Handles DocumentEvents.DocumentSaved
    Try
        ' Remove all the trailing whitespaces.
        If vsFindResult.vsFindResultReplaced = _
            DTE.Find.FindReplace( _
                            vsFindAction.vsFindActionReplaceAll, _
                            “{:b}+$”, _
                            vsFindOptions.vsFindOptionsRegularExpression, _
                            String.Empty, _
                            vsFindTarget.vsFindTargetFiles, _
                            document.FullName, , _
                            vsFindResultsLocation.vsFindResultsNone) Then
            document.Save()
        End If
    Catch ex As Exception
        MsgBox(ex.Message, MsgBoxStyle.OkOnly, “Trim Whitespace exception”)
    End Try
End Sub

Once you’ve saved this, it will be immediately available to Visual Studio, whether it is open or not.

This subroutine searches for all instances of trailing whitespace (spaces and tabs) and replaces it with the empty string.  It works when you save an individual file and when you do a Save All.  If an error occurs in the FindReplace method, a message box will be displayed.

Thanks to Michael Urman, who posted this solution on StackOverflow.com (May 19 response).

Resources

Picture cannot be published by Live Writer

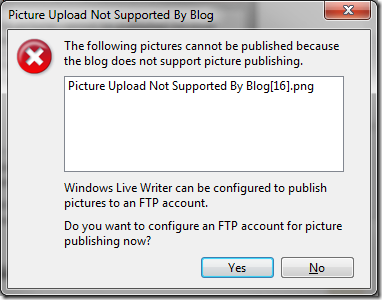
I usually use Windows Live Writer for publishing articles to my WordPress websites, but after I recently moved all my websites to a new server (running Windows Server 2008 R2 and IIS 7.5), I hadn’t gotten around to fixing the issues with it.  One of the issues I ran into was that Live Writer couldn’t publish pictures.

Picture Upload Not Supported By Blog

I figured it had to be something simple.  It took reading three articles to find the solution.  The first two talked about changing the value in the "Store uploads in this folder” setting on the Miscellaneous Settings page under Uploading Files.  This turned out to be a red herring since I’m hosting my sites on Windows Server, not Dreamhost.

The third article, written by Alok Agrawal, had the complete solution.  I hadn’t given the correct permissions to the user account to write to the upload directory.  Once I did that, I was able to publish my articles with pictures.

Resources